
Bluez A2DP AudioSink for ALSA
Ok, here is the promised follow up for my previous post.I call it A2DP AudioSink for ALSA because at the moment that's all it can handle (which means it will not support HFP devices such as handsfree headset etc). That would not be necessary anyway because the existing ALSA PCM plugin (if you run bluez in socket mode) already supports bi-directional streaming with these devices. It is A2DP which is a problem.
Despite my rants about the quality of bluez DBus API documentation, it is actually quite complete and thorough when it comes to listing the available functions and their parameters. So I will not repeat that information here; I suggest that you download bluez 4.101 source tarball and look at its /doc directory, particularly audio.txt and media.txt (you can look at it online too here).
Instead, I will summarise the critical missing information that is necessary for your to build your own A2DP Sink/Source.
Let's start with the sequence of events that happens from the time of application startup, device connection and disconnection, until application shutdown. Instead of "A2DP AudioSink for ALSA" which is a mouthful, I will just call it as "your application" (or "your app", or even "you" for short) - I'm assuming here that you're reading this because you want to do your own stuff. Otherwise why bother, right?
Ok, here we go.
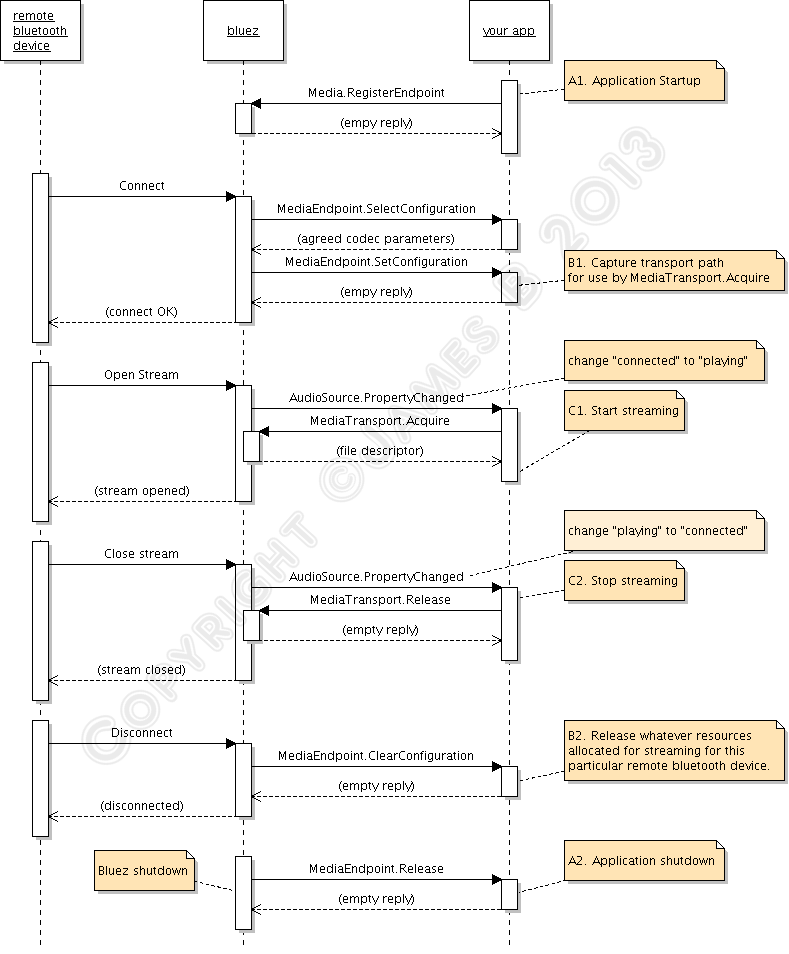
First, the caveat: the "bluetooth device" <--> "bluez" part of that diagram must be taken with a grain of salt, as it is not accurate. If you want to know the details you need to consult A2DP and GAVPD specifications. It's there so that you can see the big picture of what is happening.
You can see that there are 3 levels of events that happen during the lifetime of the your app. I have marked these as A, B, and C. Level A are the highest level events, these are startup/shutdown events and activities. Level B are events and actions that you must do when a remote bluetooth device is connected or disconnected. Level C are the actions you must do to carry out the actual audio streaming.
"Level A" events/actions (A1 and A2)
There are the events/actions you must do/handle when your application is starting up or shutting down. These actions/events only need to done once.
A1. Application Startup. Upon starting up, you need to tell bluez that your app will handle A2DP Sink or Sources for it. You do it by calling org.bluez.Media.RegisterEvent with the appropriate parameters, mainly UUID, Codec, and Capabilities. Bluez documentation doesn't make it clear, but you cannot just plug arbitrary made-up values here. "UUID" must be one of the pre-defined "Service Class identifiers" (from here), you want either AudioSource or AudioSink UUID. "Codec" must be one of the available supported codecs from A2DP specification, and the "Capabilities" must be filled with the particular codec's capabilities that you want to support.
If the registration is successful, you'll get an empty reply otherwise you'll get an error.
A2. Application Termination. Assuming you have successfully registered, bluez will notify you that your registration has been cancelled. This usually only happens the the bluetooth daemon itself is about to shutdown. Bluez does it by calling org.bluez.MediaEndpoint.Release method, which you must implement and handle (don't you wish now that bluez documentation differentiates between real "API" calls and "callback" interfaces, like this one?
 ). At this stage you don't need to de-register or do any other cleanup with bluez, you just need to clean-up your own resources. Reply with a blank message, and after that you are free to terminate your app.
"Level B" events/actions (B1 and B2)
There are the events/actions that happen / you must do when remote bluetooth devices get connected. It can happen multiple times within the lifetime or your app (ie between Level A events), for the same devices (in pairs), and for different devices (may be overlapping).
B1. Device Connection Events happen when a remote bluetooth device is connected. Assuming that your registration is successful, bluez will call your app again when an A2DP device is trying to connect to the computer. It does it using org.bluez.MediaEndpoint.SelectConfiguration. You will need to implement this method and interface and handle the call. Through this call, bluez will pass you some "Capabilities" codec parameters from the other end. You are supposed to compare this with your own capabilities and choose the best match that provide the highest quality audio. Your reply to bluez will contain the this chosen configuration.
If everything is all right, bluez will then call your app again, using org.bluez.MediaEndpoint.SetConfiguration. The parameter to this call should contain exactly the same codec parameters you gave back earlier in your reply to "SelectConfiguration". Among other things, the most important thing you must do here is this: you must record the "transport path" given as parameter of this call. It is a unique object path that you need to pass along to org.bluez.MediaTransport.Acquire to get the file descriptor you need to use for the actual streaming. If you don't keep that path, you can't find it again. All being good, you reply with empty message.
B2. Device Disconnection Events happen the remote bluetooth device is disconnected. Bluez will call you on org.bluez.MediaEndpoint.ClearConfiguration method. You are supposed to clear any of your resources you keep for that particular bluetooth device connection (ie, that particular "transport path"). Reply with a blank message.
"Level C" events/actions (C1 and C2)
These are the events/actions that happen / you must do to do the actual audio streaming. It can happen multiple times within "Level B" events for the same remote device, usually in pairs.
C1. Start streaming event. To detect this event, you must listen to org.bluez.AudioSource.PropertyChanged signal and keep track of its "State" property. The "start streaming" event happens when the state changes from "connected" to "playing". (There are a few other events too, which may be interesting for other purposes but not for us).
When this happens, you need to call org.bluez.MediaTransport.Acquire. Bluez will give you a file descriptor that you can read from, as well as its Read MTU (maximum transfer unit) - which is how big each packet would be. From here onwards, you can read this descriptor to obtain the A2DP packet, decode it, and output it. The Read MTU helps to determine how big a buffer you need to allocate. Note that the read isn't always successful, you must allow for error conditions such as EAGAIN because your CPU will be much faster at reading than what bluetooth (and the remote device) can send.
C2. Stop streaming event. Like "start streaming event", you can't decide this from org.bluez.AudioSource.PropertyChanged signal alone; you need to detect the transition, which is "playing" to "connected". When this happens, you need to call org.bluez.MediaTransport.Release to release the transport back to bluez. In my tests, this is not strictly necessary but it is the polite way of doing it. It is also good for you to detect this event so that you can can tell our "streaming" function to stop its work and rest for a while.
That's it! Easy peasy eh?
How about A2DP Source?
The events described above are to for you to make your computer act as A2DP Sink (or "Source", in bluez' parlance). What about building A2DP Source (the computer to send audio data to bluetooth speakers)? As it turns out, the sequence of events is exactly the same with very minor change:
1. Instead of AudioSource.PropertyChange, you need to listen to AudioSink.PropertyChange.
2. The transition you need to detect is a bit different - instead of "connected" -> "playing" (and vice versa), you listen to "disconnected" -> "connected" (and vice versa).
3. You write to the descriptor with encoded data instead of reading from it.
About The code
In the source, I create a thread for doing the actual streaming (reading/writing to the file descriptors). I create the thread when I received B1 event (SetConfiguration) but they are suspended until I receive C1 event - that is, after I have completed MediaTransport.Acquire call to get the file descriptor. I suspend the thread again when I receive C2 event, and only when I receive B2 event (ClearConfiguration) I terminate the thread.
The rest is straightforward. The code implements both Sink and Source. As you can see, the difference in handling is minimal.
The code is provided as an illustration and working example. It skimps on error checking; it focuses neither on performance nor robustness, but more on the working (and hopefully correct) way of handling A2DP connection under bluez. That being said, I find that the Sink is good enough, while the Source is a bit unsatisfactory. There is a README inside the tarball that shows how you can setup ALSA asoundrc for use with the A2DP Source so that it can act as a poor man's ALSA PCM plugin.
As usual, the code is released under GNU GPL Version 3 or later unless the bits that I took from PulseAudion and bluez itself (SBC stuff, SBC setup stuff, and actual A2DP packet encoding/decoding) - they are licensed as per the original PulseAudio and bluez licenses.
Get it from here.
Bluez 5 and beyond
Question: Bluez 4.x is already obsolete by now. What do I have to do to get this example to work with bluez 5?
Answer: A lot of work.
 I have not investigated bluez 5 version of this fully as I'm quite satisfied with bluez 4 for now. But from what I have gathered, the sequence of events is identical. Sure the DBus interfaces change their names (bluez 5 add "1" to the interface names, e.g. "org.bluez.MediaEndpoint" becomes "org.bluez.MediaEndpoint1"); and the signals change their skins too (AudioSource/AudioSink are gone, replaced by generic org.freedesktop.Properties.PropertyChanged, and you can probably decide whether to start/stop streaming directly from the state instead of having to watch the transitions), but the underlying events are still the same.
Conclusion
A2DP is just a small part of Bluetooth specification. If you look at the links I gave earlier, you will see Bluetooth comes with over two dozen "profiles" (ie, functionalities). Bluez doesn't implement all of them (although the unimplemented list is getting smaller very day, thanks for the very hard work of bluez developers), which is fine, but bluez could really do better with its documentation. At least give us userspace programmers something to get around our head on. Until that happens, I still consider that "bluez is one of the best kept secrets in Linux".
19 Comments - Edit - Delete
Bluez must be one of the best kept secrets in Linux
PrologueYou don't believe me? Quick - tell me, what does Socket option mean in /etc/bluetooth/audio.conf? Why does it have to be enabled for audio streaming (from computer to bluetooth speakers/headsts) to work? Along the way, what are other options (other than this "Socket") available, and what do they mean?
Not in your local manpages? Here, let me google it for you: http://bit.ly/11q1jdq
The first link (at least in my browser here, everyone knows Google does habit-tracking...) will bring you to the ArchLinux wiki. Arch Wiki is usually very explanatory, but for this case, if you scroll down and read the details about this "socket" stuff - well, it simply refers back to its source, Gentoo Wiki. Let me save your from googling http://wiki.gentoo.org/wiki/Bluetooth_Headset. Yup, no explanation there either.
And from there, it goes down the rabbit hole. And down there I went.
Down the rabbit hole
The latest release of Fatdog64 comes with partial bluetooth support using bluez 4.101 (the latest and probably final release of bluez 4.x series, now that is has been superseded by bluez 5.x). Bluez 4.x series comes with an ALSA PCM plugin. This plugin makes it possible for the computer to stream audio to bluetooth speakers (and headsets) - provided, of course, one has the correct settings in audio.conf with that Enable=Socket line inside (yes, Fatdog64 is pre-configured with this). All that is required after that is to setup the correct asoundrc file, and in Fatdog64 this is taken care of by the Set Default Soundcard applet in Fatdog64's control panel. In short, with this you can listen to youtube using your bluetooth speakers.
In technical terms, the bluez ALSA PCM plugin is a Source - source of the audio stream, to be sent over to the bluetooth speakers. The speakers in this case is called as the Sink - where the audio stream is received.
But there is no plugin for the reverse.
That is, how to to listen to the music in your phone from your computer? (the computer may be connected to a stereo set). That is, how to make the computer as the Sink with the phone as the "Source"?
Back to google. And google I did, nothing I found. All the references I can find when I googled for "bluetooth streaming audio to my computer" always refer to how to do it with PulseAudio (load pulseaudio module this and module that, connect them, and magic happens). Very helpful and very handy except that it is useless for me because I don't run PulseAudio and I'm not about to. (I don't have to run PulseAudio or any other audio server when I plug-in a USB audio soundcard - so why should bluetooth?!)
Remember what I said at the beginning? "Bluez must be one of the best kept secrets in Linux."
Bluez source tarball comes with a /doc directory that contains a handful of text files containing extremely concise DBus "API" descriptions. Now, I am not allergic to documentation in text format (in fact I'm very annoyed with packages whose documentation need to be "made" or "built" first before it can be read - especially if it requires huge or esoteric tools to do so - but that's another story); but did I just say "handful" and "extremely concise"? You can have a taste of this "documentation" here. No howtos. No tutorials. Not on the source tarball, not on bluez.org, not anywhere. In fact, later on I learnt that some of these "API" are not APIs at all - some of them are "function prototypes" ("DBus interfaces") for callbacks which our own application has to provide and will be called by bluez! (instead of us calling into bluez). (Note: There is actually a rather nice bluetooth/bluez tutorial here, but it focuses on data communication aspect of bluez using sockets and RFCOMM; nothing to with bluez DBus API and audio/media. Again, there is no documentation from bluez for these subjects too!).
Sure, hotshot - someone might say - why don't I just read pcm_bluetooth.c (the ALSA PCM plugin) from bluez package, understand the interface, and reverse it to create the "Sink" interface? I will have to admit, I'm not that well versed with ALSA plugin interfaces which is absolutely required if you want to separate the ALSA stuff from bluez stuff in pcm_bluetooth.c (I know ALSA good enough to output sound using its API, but that's it). And my original idea is once I have the "Sink" interface, I will extract the audio stream in a known format and send it to stdout where I can pipe it over to "aplay" or "ffmpeg" or "sox" or whatever to actually output the soud; this way I don't have to mess with ALSA libs at all.
So I didn't follow that path, and later on it turned out to be a good move for a reason even more obscure: The ALSA PCM plugin talks to bluez using what is called as the "audio socket API" (this, by the way, is the answer to the first question on the opening paragraph of this post) and it is already deprecated for sometime (which is why it isn't enabled by default).
OK. Lacking this first-hand information from bluez, I spent hours googling to find explanations or at least overview of what this bluez DBus audio/media API is all about.
Among hundreds of results from Google, I could only find one place that explains it, here. It is simply the simplest, clearest overview of bluez usage from userspace perspective. It was written in the context of Android but it easily applies to other situations too. Buried deep in that post, is a link to a PDF document which highlights bluez DBus API overview, http://download.tizen.org/misc/media/conference2012/wednesday/bayview/2012-05-09-0900-0940-bluez-_plugging_the_unpluggable.pdf.
One wonders why this very important document is hidden deep inside Tizen's website maze. Only after one realises that bluez is mainly driven by Intel (and Nokia in the past, when they were still supporting the Maemo platform), you will see the connection: Tizen is a joint Intel-Nokia initiative too (being the rightful descendant of Maemo/Meego/Moblin). There is nothing wrong with that, in fact I'm glad that they take the initiative to sponsor the development of this very important protocol stack in Linux kernel. My only question is this: why oh why isn't this information available from bluez.org instead; is that too much to ask?
Anyway. That PDF got me started, but that information is - as mathematicians call it - necessary but not sufficient.
One need to read this post (I need to enable the Source interface in audio.conf), this post (when I can request bluez for the file descriptor for actual reading/writing of audio data) and then lastly this post (I need to disable the Socket interface otherwise the bluez Media DBus API won't work!) to make it work.
Once done this enabled me to dump the audio data to stdout.
Nice! But how to actually listen to that?
As it turns out, the audio data is compressed with SBC codec. But I can't just use "sbcdec" tool from SBC package to decode it, as the audio data is encapsulated in A2DP packets, not naked SBC-compressed audio data. A2DP packets are RTP packets (referenced by A2DP specification, and detailed in this IETF draft) containing A2DP Media Payload. We need to extract the SBC audio data, pass it through SBC decompressor, and only then we get raw audio data that can be sent to ALSA.
I took a shortcut - I already know of a good implementation that can do this decoding: PulseAudio. So I cracked open PulseAudio source tarball. Fortunately the encoding/ decoding functions are obvious enough even for one who knows zilch about PulseAudio internals; I took the decoding function out and merge it to my code.
Minor details such as how to tell my phone to connect its audio source to my computer was found rather quickly by trial and error, like this:
dbus-send --system --dest=org.bluez /org/bluez/[bluetoothd-pid]/hci0/dev_XX_XX_XX_XX_XX_XX org.bluez.AudioSource.Connect(it is one long line, not two lines).
And the first sound that came from my phone aptly came from a song called "Painting Raindows" :)
Notes: Bluez sinks and sources
Note to self: bluez' treatment of the terms "Source" and "Sink" are not consistent. Let me explain:
Bluez audio has two interfaces, like these:
"bluetooth device <--> (a) bluez (b) <--> application"
For example, in our case, viewed from (a), the interface is called as a "sink" because bluez receives data from external bluetooth device (the phone). Once processed, bluez will pass the data to an external application (view (b)); viewed from here bluez acts as a "source" of data to this external application.
The Bluetooth specification always uses viewpoint from (a). Bluez uses both view points, sometimes from (a) and sometimes from (b). That is also the very reason why to enable the computer to act as an audio "sink", we need to add "Source" to audio.conf.
Did I say that bluez must be one of the best kept secrets in Linux?
One more thing, honey ...
Once I got the audio sink working, I was about to wrap up and close my little experiment when I realised something.
Do you remember what I said about enabling Socket in audio.conf to enable ALSA PCM plugin, so that one can stream audio from the computer to the external bluetooth speaker? Good. Do you remember what I said about disabling Socket in audio.conf before the bluez Media DBus API can work, so that we can stream audio from phones to the computer? Good.
Not!
Obviously it means I can't do both at the same time!
Well, the solution, according to the bluez team, is simply to drop the Socket API (and the associated built-in ALSA PCM plugin) altogether because it is already deprecated and will be removed soon anyway! In another words, I will now also need to write the an A2DP "Source" interface. This time around, google didn't help me at all, but fortunately the bluez team did the correct thing and followed the same exact event flow with the "Sink" interface, as tests and trials confirmed. So I just need to modify the code a little to listen to different events (AudioSink instead of AudioSource). As before, the A2DP packet preparation and SBC compression is taken from PulseAudio.
To the future and beyond ...
And the happy ending is, all this work will be at least partially wasted in bluez 5. Firstly, bluez 5 removes the Audio Socket API (which also means the built-in ALSA PCM plugin is gone for good). Secondly, bluez has big API changes. Apps built for bluez 4 *will not work* without re-factoring and re-testing. Sure, using the DBus API instead of the socket API is a smart move, but still not good enough for bluez 5.
I am not the only one. It is telling that even PulseAudio team themselves have not released a version that supports bluez 5, six months after the first version of bluez 5 was released. Mind you, PulseAudio team works closely with bluez team; they got first hand knowledge of the impending changes and has already started to patch PulseAudio to accomodate bluez 5 API well before bluez 5 was officially released....
Apparently, despite being the official Linux bluetooth stack since 2001, bluez userspace API is not stable yet...
As for Fatdog64, I think I will stick with 4.101 for a while.
The code
I will follow this up with another post that documents all the findings in more details, as well as the corresponding source tarball.
The Sink works relatively well, the Source, while usable, isn't a comparable replacement for the ALSA PCM plugin. It sort of works; you can pipe raw sound data to it and you will hear it on your bluetooth speaker. Combined with ALSA PCM File plugin, it can be used as a poor man's ALSA PCM output plugin, but it doesn't always work (ffmpeg works, VLC stutters, youtube simply crashes). It also suffers from an odd problem of stuttering when I connect both the sink and source at the same time (the sink never stutters).
The code is meant as a proof-of-concept, as a learning tool, and as a working example of the bluez Audio/Media interfaces. It focuses on neither performance nor robustness. If I have time and inclination I may do one that do it properly - as a native ALSA PCM plugin.
Epilogue
I have not talked about DBus, bluez' IPC of choice. One can't avoid DBus at all because bluez API is exposed as DBus method calls (bluez has other kind of APIs - these are totally undocumented). Some jokingly said that one of the reason why DBus is so popular in embedded devices is because if people want to get bluetooth functionality using bluez, they'd better bring DBus in too ...
I'd talk about DBus, "whose reference library is not meant to be used", in another occasion.
As a parting note, here is the link to a suite of bluetooth userspace tools much better than the one you can find in bluez package itself. I wish this tool is more popular, I wish I had know this tool when I started to experiment with Fatdog64's bluetooth support. Isn't it telling that most of wikis and solution websites advocate the usage of "simple-agent" python script when one needs to do device pairing on command line - when this python script actually lives in "/test" directory inside bluez source tarball? Hmmmm.
Bluez must be one of the best kept secrets in Linux.
10 Comments - Edit - Delete
Sources for World Map stat counter
Okay, as promised, here is the sources to the worldmap stat counter.Requirements
To use the stat, you must have the following installed on the webhost:
1. GD library (usually called "gd" or "libgd")
2. netpbm tools (usually called "netpbm") - this gives you tools like pnmtojpeg, jpegtopnm, etc
3. "Fly" - this is a command line interface to GD, from here: http://martin.gleeson.net/fly
How to use it
1. Extract the archive to a directory.
2. Get the maxmind.com's GeoIP Lite City CSV database from here: http://geolite.maxmind.com/download/geoip/database/GeoLiteCity_CSV/GeoLiteCity-latest.zip.
3. Convert those CSV databases to binary databases like this:
./convert.sh /path/to/geoiplite/block-database.csv /path/to/geoiplite/location.csvYou will get ipinfo.dat and locinfo.dat in the current directory.
4. Copy these two 'dat' files to your cgi-bin directory, along with ipgeocode and genimage.sh and map.png
5. genimage.sh expects that its standard input is feed with IP addresses, one per line. It will produce a JPEG file on standard output, having all the locations of those IP addresses marked.
6. You will need to create a CGI script which calls genimage.sh and feed it with the IP address, as well as returning a proper CGI header etc. For sjppblog, this script would do:
#!/bin/sh
echo -ne "Content-Type: image/jpeg\r\n"
echo -ne "Content-Disposition: inline; filename=\"stat.jpg\"\r\n"
echo -ne "\r\n"
awk -F"|"  '{print $1}' /path/to/your/sjpplog/online.ppl.uo 2> /dev/null | sort | uniq | ./genimage.sh
That's all, you're good to go!
Some notes:
1. map.png is a PNG file converted from the original JPEG image here: http://upload.wikimedia.org/wikipedia/commons/thumb/7/74/Mercator-projection.jpg/310px-Mercator-projection.jpg. You can change the image, just make sure it is in PNG format and modify the dimensions in genimage.sh with the new image's.
2. The archive contains 32-bit static programs. This will work on all version of x86 Linuxes (both 32 an 64-bit), so you don't need to re-compile it (although you can if you want - all the sources are included).
3. Fly unfortunately isn't included in most distributions so you have to compile it yourself. I would have included a compiled version in the archive except that in addition to libgd it also depends on other large system libs like libpng, libjpeg, libfreetype etc. It is used in the final rendering of the "marks" in the map image; if you don't like to use it you can modify genimage.sh to use other command-line tools like imagemagick, graphicsmagic, gmic, etc.
4. The GeoIP Lite database is courtesy of www.maxmind.com. The conversion is purely for performance reasons, one can do exactly the same thing using awk and grep but the speed is much slower (more than 100 times slower).
5. As usual, the sources are provided in terms of GNU GPL Version 3 license.
4 Comments - Edit - Delete
World map stat counter
If you happen to visit this page: https://planet.gnome.org/ (disclaimer: I'm not affiliated at all with GNOME), at the bottom of the page you will see a small picture of a world map with dots. The dots represent where the people in the GNOME community come from. I have seen this in other websites too, but they use the dots on the world map to represent where the sites' visitors come from, so it is a kind of stat counter.So! I want one too, because it looks good and it's interesting. It's actually nothing new and many others have created them. One can even easily register for this widget on many web analytics sites. But I don't want to use a third party analytics - I mean, this blog already uses Google webfont and a few other online javascripts providers (which are useful), adding another one just to show a silly stat counter sounds ... well, silly.
So I rolled up my sleeves a bit and started my google-fu --- to find nothing. I really need to sharpen my google-fu.
Then I sat down and thought about it - how difficult is it? All that is needed is to convert all those IP addresses from my webserver log into some sort of location identifiers (cities, countries, etc) and from there, to find the latitudes, longitudes (popularly called as 'geocoding'), and then transform them to x,y coordinates so we can draw them on a map. Sounds simple, right?
So I rolled up my sleeves a bit higher and went on to find the information. Firstly, I need to find out how to convert a bunch of IP addresses to a 'location' (=be it cities, countries, or may directly in latitude/longitude). As it turned out, there are quite a few who provides the service to do this conversion. A few examples that I find are: MaxMind's GeoIP, HostIP, IpInfo, geonames, and a few others. Most of them offer web-services - some are RPC-based, some are REST-ful web-services with JSON or XML payload (Again, I'm not affiliated with them - this is just the result of my searches).
I won't comment on the quality of their services (which obviously vary from one another) because at the end I decided not to use any of them. The reason is simple. I need to geocode a bunch of IP addresses, not only one. Geocoding one IP address through web-service is nice and good, geocoding hundreds of them - unless they have a specific bulk-geocoding service, is going to be a hassle and slow, not to consider that I may violate the terms of service. So, no, I need a better way to do it.
Fortunately, some of the excellent sites not only offer geocoding web services; they also offer the geocoding database. That's right, a database that contains a mapping between IP addresses and locations. The 'locations' here varies, some provides the countries in which the IP addresses are located, some are based in cities, some provided the longitude/latitude directly, etc. In the end, I decided to choose MaxMind's GeoIP. They provide a 'lite' version of the geocoding database under CC 3.0 license, which is nice of them. Even this 'lite' version consists of over 50MB worth of data in the CSV format - more than enough for a silly stat counter.
With their database, the 'geocoding' service because as a simple as search problem - given an IP address, find a row in the database which includes that IP in the row's IP address range. Once done, you've got the lat/long directly. Problem solved! Hey, I could use scripts to do this, awk will do nicely, something that naively looks like this:
awk -v myip=$IP ' $1 >= myip && $2 <= myip { print $6, $7 }' geoip.dataIt does work, and it worked fast - for one IP address. But on my laptop it took me about 120ms to do one search for one IP address. With a hundred IP addresses, that will translate to 1.2s ... that's slow. I can guess why it is slow - string operations, conversion of strings to integers, etc - most of the time that only needs to be done once. So why don't we do that? In the end, I wrote a bunch of simple C programs pre-process the geoip database, converting it from text into a fixed-record binary format. Once I have *that*, I can load them into memory and access them as arrays, using binary search to look for matches. As it turned out, I don't even need to load them to memory - I can just access the data file as memory-mapped file. And that cuts down the search time from 120ms to under 2ms. Not bad!
Well after I have lat/long, I need to convert them into xy coordinate of my world map. I got the world map from Wikimedia here. I chose the 310px version. From there a simple read of Mercator Projection will tell you what you need to know on how to do the conversion.
Okay, I have the geocoding, I have the map, I have the xy coordinate markers to be put on the map. The last component I need is some scripted drawing software to put these marks into the map image. There are many ways to skin this cat, but the simplest one is to use the famous "Gd" library (old home page here, new one here. So I got it, compiled it, and ... well it is a library. There was no tool to do it from the shell, one is supposed to write a C program to use them! There are wrappers for them: for Perl (Perl::Gd), PHP (PHP-Gd), and a few others - but I'm not using any of them (except Perl, and despite the beauty of the language, I've decided to stay away from it). Oh no, the other options is to use ImageMagick, but I really prefer not to use a chainsaw just to cut a strawberry branch. Fortunately, a kind soul has written a scripting tool for Gd, called 'Fly', available here. It is dated 2009 but still works beautifully today.
The rest is just a few scripts to glue all these together, and this is the final output :)
This map will be a permanent addition to the 'Stat' section of the menu block at the right hand side of this page.
I will make the code available later after I tidy it up a little.
No comments - Edit - Delete
Linux Container in Fatdog
IntroductionAs noted in this and this post, I have been experimenting with Linux Containers (LXC or lxc for short) lately.
What is LXC? In short, it is a collection of technologies that allows processes to be compartmentalised. A process in one compartment (or "container", in LXC-speak) cannot interact with processes in other compartments. It's the equivalent (in terms of concept) of FreeBSD jail in Linux.
What is it good for? It's good to secure 'server' processes, as when these processes are broken, an attacker can only affect things inside the container (presumably, each server process is allocated one container to limit this kind of damage). This has been the basis for the so-called Operating System Virtualisation.
In this respect, LXC is late to the game. FreeBSD has its jail for years. Solaris as 'Solaris Container', and so is many other operating systems (except Windows, probably
 ). In Linux alone, it has been preceeded by Linux VServer and Virtuozzo/OpenVZ by years. They also have more features that LXC currently doesn't have. LXC however, has the benefit of being available from the vanilla kernel, not patches needed - just compile-time configuration.
More information about LXC: here (LXC manpage), here (IBM developerworks), here (Ubuntu community wiki) and many others you can find using your favorite search engine.
LXC support in Fatdog
In next version of Fatdog, the kernel will support LXC.
Many years in the making, the final component of LXC ("user namespaces") was merged with the kernel in Linux 3.8. Unfortunately, this component requires extensive changes to other kernel components that when many of them were not ready for this change; thus making 3.8 kernel less than ideal for running LXC. The situation is better in Linux 3.9 - only the XFS filesystem still doesn't work with user namespaces. I was hoping that 3.10 would fix this but as of today, at 3.10-rc4, I see don't see it happening, so if we ever need to ship Fatdog with one of these kernel, we will have to choose either to enable XFS filesystem support, or to enable user namespaces. I hope we don't have to choose by the time we release. LXC can still run without user namespaces feature, although it will be less secure.
In addition to the kernel, one needs to install LXC userspace utilities from the Package Manager (this model is similar to User Mode Linux support in Fatdog - the scripts are there, but you need to install the userspace utilities and the UML kernel first).
Now, when creating the Fatdog convenience interface to LXC, I have two choices:
a) follow the sandbox model (zero configuration)
b) follow the UML model (persistent configuration)
I have decided to follow the sandbox model (zero configuration). The scripts are called sandbox-lxc (and rw-sandbox-lxc for the one with persistent storage). The reasons I go with this model is:
a) it is slightly easier to use
b) if one needs to run an LXC container with persistent configuration, the LXC userspace tools themselves already supports this model (see lxc-create and format of lxc-template config-file, so there is no need to duplicate this excellent functionality.
c) lastly, with the sandbox model you can easily copy/transfer/backup the container root filesystem from the "host" (e.g. a tool like sb2dir.sh will work; if you need to copy files to the sandbox just copy it over to the sandbox's fakeroot).
How to use these scripts? They are identical with sandbox scripts, so instead of sandbox.sh you run sandbox-lxc.sh. Instead of rw-sandbox.sh you run rw-sandbox-lxc.sh.
When run, in addition to asking about the layers you want to use, it will also ask whether you want to be able to launch a desktop. If you said yes, the host's /tmp will be mapped inside the container - which means the processes inside the sandbox can change stuff in the host system and connect to processes in the host - but it is a requirement if you want to run Xnest from inside the container.
These scripts by default will run without user namespaces. You can tell them to run with user namespaces by putting IDMAP=yes to the environment before running them, like this: IDMAP=yes sandbox-lxc.sh. Support for kernel user namespaces is auto-detected, if the kernel doesn't support it IDMAP will have no effect.
When run without user namespaces, these capabilities are dropped: sys_module (load kernel module), sys_time (change system time), and syslog (change kernel logging parameters).
When run with user namespaces, all the UID are shifted by 10000 (ie, the container's root is actually a user with UID 10000 in the system).
In either case, the container cannot create block device nodes (only character devices) and will have its own hostname and network interface which you need to configure manually if you want to connect to the network from within the container.
These scripts, the LXC-enabled kernel will be in the next release of Fatdog (the LXC-userspace tools are already in Package Manager but they are useless without LXC-enabled kernel). Beware that they are still considered experimental, as is LXC itself.
No comments - Edit - Delete
Fun with Fatdog
One of the forum member in Puppy Linux forum, Ted Dog, asked whether Fatdog can be modified to run with uncompressed filesystem in RAM, provided that one has enough RAM to do so. His idea is that since uncompressed Fatdog stands at around 700MB, on machines with more than 4GB it should be possible to have one giant initrd that contains uncompressed filesystem that got fully loaded into RAM and run Fatdog from there. Since there is no decompression is involved other than possible once at boot-up (if the initrd is compressed), it should run like the wind. The original post was here.There is no practical purpose of doing this (that I can see), but it sounds fun :)
There are two possible way of doing it:
1. Expand the content of the basesfs (fd64-620.sfs currently) and merge it with initrd.
2. Expand the content of the basesfs and store it into uncompressed ext2 filesystem.
In either case, it should be possible to include modifications of the original Fatdog stuff like a "remaster".
Fatdog already supports booting without any basesfs. It also supports basesfs with filesystems other than squashfs. So all that is needed is to prep the initrd.
For 1, what is needed is to get a snapshot of the running system, and do minimal modification so that it is bootable, and re-create the initrd from there.
For 2, what is needed is to create a basesfs that contains uncompressed ext2 filesystem instead of squashfs, and insert this basesfs into an existing initrd.
As it turns out - Fatdog already has the tools to help to do both: the sandbox. One runs sandbox to have a "snapshot" of the running system which one can play inside without affecting the real system. When one starts sandbox, one can choose which layers to be included in the sandbox - including the modifications already in the savefile. As it turns out, the sandbox root filesystem is also visible from outside the sandbox, in "/mnt/fakeroot" for 621 and "/mnt/sb/fakeroot" for 622 onwards. By choosing the correct layers, we can get the needed view for either 1 or 2.
From here it is straightforward.
For 1, one just needs to create the initrd from the sandbox root, after undo-ing some changes done by sandbox script, and restoring deleted links required for booting, and a minor modification to the initrd init script (/sbin/system-init).
For 2, it is even simpler - just create an empty ext2 image file, and copy over the sandbox root to that image file, again after undoing some changes done by the sandbox script. Then open up an existing initrd and overwrite the basesfs (fd64-620.sfs) there with the image file you've just created; then rebuild the script.
Fatdog's initrd currently stands at around 210MB. This "giant" initrd, when gzipped, is about 260MB. It's bigger because it is compressed with gzip instead of with xz; if one choose xz compression it will have more or less the same size. But this size difference is not important, either way the initrd will be decompressed before Fatdog starts - and the memory consumed will be the decompressed size of the initrd which is around 700MB. But then, as Ted Dog said, there will be no decompression overhead for anything, so it should run like the wind :)
I have written the details and the exact steps on how to do both 1) and 2) in the forum, so I will not repeat it here.
Method 1
Method 2
No comments - Edit - Delete
Fonts!
I like fonts. No, I don't like fonts - I love fonts. I collect them, especially the good ones. I like their shapes - curvy shapes, boxy and rectangular shapes, flowery shapes, and all other odd shapes too. I like their designs - monospaces, proportionals, serif, sans, blackletters, narrows, books, uprights, italics, handwritten, cursive, floral, outlines, dingbats, icons - all of them. As they say, variety is the spice of life.I have over 300 fonts installed in my system although I don't use them all obviously - but I yearn for the day that I can
I can't really explain why I like them; other than the fact that I like to read and good fonts are really pleasing to the eye: it reduces eyestrain and make materials more readable. But my love for fonts is beyond just practicality - I just like to see the pictures generated by a body of text rendered with a well designed font. Good fonts are works of art - you can see how much effort went into their creation by looking at how tidy, fluent, aesthetic and yet consistent the resulting displays are.
There are many places where you can get good quality fonts (open source or otherwise) in the Internet. Here are some of my favorite places:
• Font Squirrel (http://www.fontsquirrel.com) offers many commercial-use-friendly free fonts.
• Google webfonts (http://www.google.com/webfonts) offers many fonts with direct @font-face embedding for your own websites
(this site uses google webfonts service too).
• Da Font (http://www.dafonts.com) is a font repository with huge collection that has been around for a long time; if you are after an oldish font (from early days of truetype), chances are dafont.com will have it.
Of course, keep an eye on the designers' own websites too.
Disclaimer: I am not affiliated with any of those websites. I'm just a satisfied user.
Fatdog64 comes with the complete set of DejaVu fonts: Serif, Sans, Mono, Condensed, all the bold and italic versions. Dejavu is a versatile font that meets needs of many applications. In addition to a large repertoire of letters ("glyphs" to be precise) for many languages, it is pleasing to look at too. Dejavu Sans is the default UI font for Fatdog64 while Sans Mono is the default for text editors such as Geany and Leafpad
as well as the rxvt-unicode terminal emulator.
I have recently switched to Anonymous Pro for my text editor font, but for terminal I stick to Dejavu Sans Mono. This blog uses Kotta One for the body text, and Italianno for headings, and Cookie for categories - all courtesy of Google webfont.
Recently, Adobe and Google contributed a new hinting engine for CFF fonts (aka OTF fonts) to the Freetype project. Freetype is the open-source font rendering engine (ie the piece of software that convert fonts into bitmaps / images that gets rendered to the screen). According to many reports, it is vastly superior than the already excellent existing Freetype hinting engine.
The good news is that this new version of Freetype (2.4.12) will be in the next Fatdog, the bad news is that the new CFF engine only works with CFF fonts (that is, OTF fonts), but not TTF. In my subjective view however, the new Freetype produces clearer and more crisps rendering even of standard TTF fonts.
If, like me, you love your fonts and the pleasing displays they create, this would be something to look forward to.
No comments - Edit - Delete
AMD Catalyst driver patch for CONFIG_USER_NS
As hinted in this post, I have been experimenting with LXC for while. It has been a fruitful journey and I ended up with an LXC-version of Fatdog sandbox which enables one to run a sandbox with full privilege separation (unlike the standard sandbox which only uses chroot), which I will write in another day.Running lxc requires the lxc userspace tools (which is on the sourceforge.net URL above, or here for the bleeding edge), and requires some kernel compile-only options activated. No, unlike OpenVZ or Linux-VServer, you don't need custom kernels --- all that is needed for lxc have been slowly merged into mainline kernel in the last few years, but you do need to enable these features when you built the kernel.
One of the latest feature is user namespace (CONFIG_USER_NS). This feature, in short, enables uid mapping - a "root" (uid 0) in the container can be just a regular user in the host system (e.g. uid 1000). Without this feature, a root is a root is a root - inside and outside the container and it has the same power (unless you shave its capabilities - but again that's another story). This feature was finally merged in Linux 3.8, however it wasn't really working well because a lot of other kernel components were not adjusted for it (mainly filesystems). In Linux 3.9, the situation is a bit better, only XFS can't handle it. With the hard work from the kernel and XFS team, we'd expect that XFS will be fully compatible with user namespace by the time Linux 3.10 is released.
I have been testing with this feature in Linux 3.9, and found out that the AMD Catalyst driver would not compile. That's a BIG problem. My laptop is well supported by the radeon open-source driver, but I regret to say that while radeon probably trumps out in terms of performance, it is not a winner when it comes to power saving department. My laptop runs a full 20 centigrade hotter using the radeon driver compared to the Catalyst driver. AMD definitely needs to do more work on this! (Are you listening, AMD?)
Anyway, the conclusion is that I need that Catalyst driver to work. Just like any reasonable guy, I looked for some patches on Google but I can't find any :(
So I went on to look at the source on my own. Fortunately, it is not too difficult to fix it, and I have created a patch for it (it is a one-line patch, literally). I tested this against Catalyst 12.8 but it should work for later versions too (up to 13.4).
You can get the patch from here.
Enjoy.
No comments - Edit - Delete
Booting GPT disk in BIOS systems using syslinux
Recently I was asked whether it is possible to boot GPT disk under a system with BIOS firmware.I was somehow under the impression that GPT-partitioned disk (GPT disk for short), though perfectly usable in Linux, will not boot under BIOS systems. You need EFI or UEFI systems to boot GPT disk - that was the conventional wisdom that I subscribed to; and that was the piece of wisdom I was about to dump to the inquirer.
The good thing is that I am aware that the wisdom I subscribed to is rather old; that there may be some advancement in the fields; and especially that a GPT partition usually has a MBR protective partition which in theory could contain bootable code just like a standard MBR does; so I decided to do some quick research and tests first to avoid embarassing myself by giving the wrong answer.
It was a good decision as it turns out that GPT disk is indeed bootable under BIOS too! The answer actually depends on the BIOS and the bootloader.
As long as the BIOS in your system is happy to load MBR code and execute it - you're already halfway to the happy end. Some BIOS-es only check that the MBR is valid and will happily execute it if it does (these are the good ones), some are more tricky and check whether the MBR has a valid bootable partition (this is still workable though it needs more work), but some are recalcitrant and need a specific crafted MBR to boot from it - if you happen to have one of these, your luck may have run out.
The second part is the bootloader. GRUB2 definitely supports booting from GPT disk, and so is syslinux. Legacy Grub (Grub 0.97) does not, however there seems to be a patched version which does. Grub4Dos definitely does not support it, at least at the time of writing.
Okay, so how do one configure it? Every bootloader is different, of course, but I'll set the example with syslinux, as it is pretty easy.
For the following I will assume that your GPT disk is /dev/sda and your (soon-to-be) bootable partition is partition 3, that is, /dev/sda3. Obviously change all references to /dev/sda, /dev/sda3 and the partition 3 to your own setup.
1. Use GPT partitioning tool to mark that the partition is going to be bootable.
If you use gparted, choose "Manage Flags" and tick "legacy boot".
If you use sgdisk, type
sgdisk -A 3:set:2 /dev/sdaIf you use the interactive gdisk (by typing "gdisk /dev/sda"), enter the "extra functionality (experts only)" by typing "x", and then choose "set attributes" by typing "a". You will be asked for which partition to update, choose "3", and from there you will be asked which bit to enable, so choose "legacy BIOS bootable" by typing "2". Don't forget to save your changes by typing "w".
2. Next, mount the partition somewhere, say in /mnt/data
mount /dev/sda3 /mnt/dataLet's assume that the partition (for the sake of the discussion) is a Linux filesystem such as ext3 or ext4.
3. Use syslinux to install the boot loader, pretending that it is a regular partition:
extlinux -i /mnt/dataextlinux -i /mnt/data/boot4. The final magic is to copy syslinux's MBR code which is capable of booting GPT partition. This code is stored (usually) in /usr/share/syslinux/gptmbr.bin. All you need to do is copy this to your disk's MBR.
dd if=/usr/share/syslinux/gptmbr.bin of=/dev/sda bs=440 count=15. Congratulations, you're done! Do the usual cleanup (un-mount /mnt/data, etc) and then reboot.
6. Assuming however, you have done all these correctly and BIOS still won't boot the system (saying no bootable disk found etc), you may need to mark the protective MBR as bootable. You need to do this using "fdisk". Start "fdisk" on the disk (fdisk /dev/sda) and ignore the warnings. Type "a" to toggle the bootable flag, and choose "1" for the partition to enable. ("1", not "3", because now we are talking about the protective MBR, and there is only one partition in the MBR - the protective partition). Don't forget to save your work by typing "w". Note that doing this is actually discouraged, see for example: http://mjg59.dreamwidth.org/8035.html (Matt Garret is the expert on all things UEFI, he is the author of the 'shim' bootloader used by many Linux distros which provides compatibility with UEFI and Secure Boot) - but if this is what it takes for your system to boot, then so be it.
Caution 1: Installing bootloader is not for the faint of heart, and you'd better have a backup plan if this is your *primary* computer, in case you're doing it wrong and the system cannot come to life after that. Installing a bootloader also means that ALL your previously installed operating system will not boot unless you configure the new bootloader to boot them. If you don't understand the consequences of the actions described in the above steps, you'd better stay away from doing this altogether. You have been warned.
Caution 2:The method described above assumes that you use a GPT with a standard protective MBR partition. In this scheme, you only have one partition defined on the MBR - partition of type 'ee' which covers the entire disk; and this is the recommended way to do it. gdisk actually offers another type of protective MBR called "hybrid MBR", in this case, the GPT partition definitions are copied and mirrored into the MBR partition definitions - if you have 3 partitions in GPT you will have 4 partitions in MBR (3 GPT + original protective). This method is highly discouraged, and the reason why is written here: http://www.rodsbooks.com/gdisk/hybrid.html (by the author of gptfdisk itself).
2 Comments - Edit - Delete
SJPPLOG 1.4 Released
Scott has just updated sjpplog (the software that runs this blog) to version 1.4, see here: http://murga-linux.com/puppy/viewtopic.php?p=704592#704592. It is a relatively minor update with inputs from yours trule and Christina (forum name efiabruni), but it is still a good update.Of course, this blog now runs the updated software too. Thanks to Scott and Christina (efiabruni).
PS: Christina now runs her own version of pplog (the software from which sjpplog is based on), called pe_pplog. You can get it here: http://tine.pagekite.me/pe_pplog.pl/
No comments - Edit - Delete

