
The beginning of Fatdog ARM
A year ago, most of the people on Puppy Linux forums were taken over by the hype of ARM-based systems. (Some still do). It all started when Barry Kauler, the father of Puppy Linux, got hold of a cheap ARM-based "smart media player" (Mele A1000) which was in fact more powerful that many PCs of yesteryears. Equipped with 512MB RAM and 1GHz ARMv7 CPU, it came with Android and was advertised as a media player, but its wealth of ports and its flexibility (ability to boot directly from SD card - practically unheard of in ARM/embedded world before this) made it ideal for a possible "desktop replacement". By the time we heard about it, somebody has already managed to run Ubuntu ARM on it. Imagine, a standard Linux distribution running on a ARM media player! That was in fact very exciting.Barry started an ARM port of Puppy Linux for Mele, his first release was Puppy "Lui" (see http://bkhome.org/blog/?viewDetailed=02823, http://distro.ibiblio.org/quirky/arm/releases/alpha/README-mele-sd-4gb-lui-5.2.90.htm). Everyone was on ARM-frenzy for a (long) while. Not long after that, Raspberry Pi (Raspi for short) came, and the folks got even more excited. Barry built another ARM port for Raspi (the Mele one didn't because Mele's CPU is ARMv7 while Raspi's one is ARMv6), called "sap6" (short for (Debian) Squeeze Puppy for ARMv6 - see http://bkhome.org/blog/?viewDetailed=02865). He released a few versions of sap6 (Raspi being more popular than Mele despite its obvious shortcomings), but that was that - Barry moved on to other things (he is planning to return to it, though, he got a quad-core Odroid board late last year).
I was caught in the frenzy too, for I can see the possibilities of where this can go, provided that ARM can fulfill the promise of being the low-power, low-cost, ubiquitous computers. For example, it can easily replace traditional desktops for those who can't afford it. We are yet to see the promise fulfilled, but it is still going in that direction so I'm happy. The tablet market (where most of these ARM cpus are going) has been going strong, and despite many misgivings about tablets, if one can add a keyboard and mouse to it, many tablet users can actually become productive. All in all, it is about alternative computing platform for the masses.
To start with, I experimented with Qemu. I documented the process of running sap6 under Qemu, for those who wanted to play/test sap6 but haven't got Raspi on their hand: http://www.murga-linux.com/puppy/viewtopic.php?t=79358.
That little experiment quickly followed with my attempt to cross-build a minimal system from scratch, still targetting Qemu. There was one system that aimed to do so, called "bootstrap linux", that uses musl C library (then brand-new). After a few hurdles and many helpful advices from musl mailing list, I got it up and running (see https://github.com/jamesbond3142/bootstrap-linux/). That experiment taught me about complications of building compilers (gcc) by hand and that small, unforeseen interactions between host tools and compiler build scripts can result in hard to find, hard to debug crashes on the target system (see http://www.murga-linux.com/puppy/viewtopic.php?t=78112&start=30).
Of course, along the way I got to learn to do some cross-debugging and reviewed ARM assembly language on cross-gdb. That brought some good memories of the days I spent writing 386 assembly language for a bare-metal protected mode 386 debugger myself, for a certain 32-bit DOS extender :)
Qemu was nice but in the end I knew I needed a real hardware: compiling gtkdialog which took less than 10 seconds on my laptop took more than 10 minutes on Qemu on the same laptop. To that end, I decided to go for Mele A1000 too. That was mid last year, and apart from booting Puppy Lui on it, that Mele didn't do much for months on end.
Until now.
In the last few days I have built a new kernel and a minimal busybox-based system for it, I've got it running with framebuffer console on my TV. I used Fatdog64's initrd (busybox is suitably replaced with its ARM version) and it felt good to finally see "Fatdog" booting on an ARM cpu.
In the next few posts I will write more about these, the steps, the information I have collected (linux-sunxi has grown from useless to extremely helpful in a year) as well as future roadmaps.
Comments - Edit - Delete
Power management for AMD radeon driver is coming!
This is really good news!As I said here, my laptop runs 20 degrees centigrade hotter with open-source radeon compared to the proprietary Catalyst driver.
Apparently AMD is listening, they have just pushed 165 patches; among them is the dynamic power management similar to what Catalyst has.
Looking forward to Linux 3.11

Comments - Edit - Delete
Bluez A2DP AudioSink for ALSA
Ok, here is the promised follow up for my previous post.I call it A2DP AudioSink for ALSA because at the moment that's all it can handle (which means it will not support HFP devices such as handsfree headset etc). That would not be necessary anyway because the existing ALSA PCM plugin (if you run bluez in socket mode) already supports bi-directional streaming with these devices. It is A2DP which is a problem.
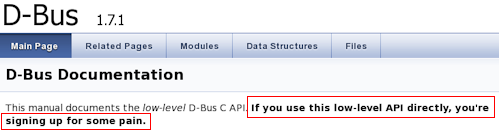
Despite my rants about the quality of bluez DBus API documentation, it is actually quite complete and thorough when it comes to listing the available functions and their parameters. So I will not repeat that information here; I suggest that you download bluez 4.101 source tarball and look at its /doc directory, particularly audio.txt and media.txt (you can look at it online too here).
Instead, I will summarise the critical missing information that is necessary for your to build your own A2DP Sink/Source.
Let's start with the sequence of events that happens from the time of application startup, device connection and disconnection, until application shutdown. Instead of "A2DP AudioSink for ALSA" which is a mouthful, I will just call it as "your application" (or "your app", or even "you" for short) - I'm assuming here that you're reading this because you want to do your own stuff. Otherwise why bother, right?
Ok, here we go.
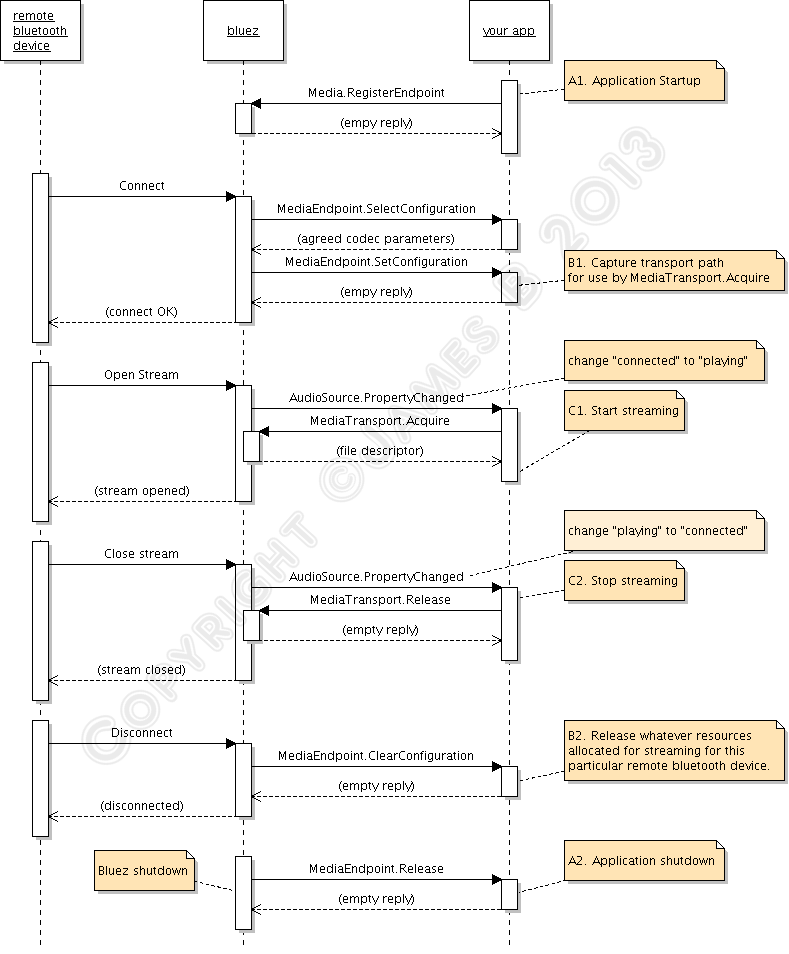
First, the caveat: the "bluetooth device" <--> "bluez" part of that diagram must be taken with a grain of salt, as it is not accurate. If you want to know the details you need to consult A2DP and GAVPD specifications. It's there so that you can see the big picture of what is happening.
You can see that there are 3 levels of events that happen during the lifetime of the your app. I have marked these as A, B, and C. Level A are the highest level events, these are startup/shutdown events and activities. Level B are events and actions that you must do when a remote bluetooth device is connected or disconnected. Level C are the actions you must do to carry out the actual audio streaming.
"Level A" events/actions (A1 and A2)
There are the events/actions you must do/handle when your application is starting up or shutting down. These actions/events only need to done once.
A1. Application Startup. Upon starting up, you need to tell bluez that your app will handle A2DP Sink or Sources for it. You do it by calling org.bluez.Media.RegisterEvent with the appropriate parameters, mainly UUID, Codec, and Capabilities. Bluez documentation doesn't make it clear, but you cannot just plug arbitrary made-up values here. "UUID" must be one of the pre-defined "Service Class identifiers" (from here), you want either AudioSource or AudioSink UUID. "Codec" must be one of the available supported codecs from A2DP specification, and the "Capabilities" must be filled with the particular codec's capabilities that you want to support.
If the registration is successful, you'll get an empty reply otherwise you'll get an error.
A2. Application Termination. Assuming you have successfully registered, bluez will notify you that your registration has been cancelled. This usually only happens the the bluetooth daemon itself is about to shutdown. Bluez does it by calling org.bluez.MediaEndpoint.Release method, which you must implement and handle (don't you wish now that bluez documentation differentiates between real "API" calls and "callback" interfaces, like this one?
 ). At this stage you don't need to de-register or do any other cleanup with bluez, you just need to clean-up your own resources. Reply with a blank message, and after that you are free to terminate your app.
"Level B" events/actions (B1 and B2)
There are the events/actions that happen / you must do when remote bluetooth devices get connected. It can happen multiple times within the lifetime or your app (ie between Level A events), for the same devices (in pairs), and for different devices (may be overlapping).
B1. Device Connection Events happen when a remote bluetooth device is connected. Assuming that your registration is successful, bluez will call your app again when an A2DP device is trying to connect to the computer. It does it using org.bluez.MediaEndpoint.SelectConfiguration. You will need to implement this method and interface and handle the call. Through this call, bluez will pass you some "Capabilities" codec parameters from the other end. You are supposed to compare this with your own capabilities and choose the best match that provide the highest quality audio. Your reply to bluez will contain the this chosen configuration.
If everything is all right, bluez will then call your app again, using org.bluez.MediaEndpoint.SetConfiguration. The parameter to this call should contain exactly the same codec parameters you gave back earlier in your reply to "SelectConfiguration". Among other things, the most important thing you must do here is this: you must record the "transport path" given as parameter of this call. It is a unique object path that you need to pass along to org.bluez.MediaTransport.Acquire to get the file descriptor you need to use for the actual streaming. If you don't keep that path, you can't find it again. All being good, you reply with empty message.
B2. Device Disconnection Events happen the remote bluetooth device is disconnected. Bluez will call you on org.bluez.MediaEndpoint.ClearConfiguration method. You are supposed to clear any of your resources you keep for that particular bluetooth device connection (ie, that particular "transport path"). Reply with a blank message.
"Level C" events/actions (C1 and C2)
These are the events/actions that happen / you must do to do the actual audio streaming. It can happen multiple times within "Level B" events for the same remote device, usually in pairs.
C1. Start streaming event. To detect this event, you must listen to org.bluez.AudioSource.PropertyChanged signal and keep track of its "State" property. The "start streaming" event happens when the state changes from "connected" to "playing". (There are a few other events too, which may be interesting for other purposes but not for us).
When this happens, you need to call org.bluez.MediaTransport.Acquire. Bluez will give you a file descriptor that you can read from, as well as its Read MTU (maximum transfer unit) - which is how big each packet would be. From here onwards, you can read this descriptor to obtain the A2DP packet, decode it, and output it. The Read MTU helps to determine how big a buffer you need to allocate. Note that the read isn't always successful, you must allow for error conditions such as EAGAIN because your CPU will be much faster at reading than what bluetooth (and the remote device) can send.
C2. Stop streaming event. Like "start streaming event", you can't decide this from org.bluez.AudioSource.PropertyChanged signal alone; you need to detect the transition, which is "playing" to "connected". When this happens, you need to call org.bluez.MediaTransport.Release to release the transport back to bluez. In my tests, this is not strictly necessary but it is the polite way of doing it. It is also good for you to detect this event so that you can can tell our "streaming" function to stop its work and rest for a while.
That's it! Easy peasy eh?
How about A2DP Source?
The events described above are to for you to make your computer act as A2DP Sink (or "Source", in bluez' parlance). What about building A2DP Source (the computer to send audio data to bluetooth speakers)? As it turns out, the sequence of events is exactly the same with very minor change:
1. Instead of AudioSource.PropertyChange, you need to listen to AudioSink.PropertyChange.
2. The transition you need to detect is a bit different - instead of "connected" -> "playing" (and vice versa), you listen to "disconnected" -> "connected" (and vice versa).
3. You write to the descriptor with encoded data instead of reading from it.
About The code
In the source, I create a thread for doing the actual streaming (reading/writing to the file descriptors). I create the thread when I received B1 event (SetConfiguration) but they are suspended until I receive C1 event - that is, after I have completed MediaTransport.Acquire call to get the file descriptor. I suspend the thread again when I receive C2 event, and only when I receive B2 event (ClearConfiguration) I terminate the thread.
The rest is straightforward. The code implements both Sink and Source. As you can see, the difference in handling is minimal.
The code is provided as an illustration and working example. It skimps on error checking; it focuses neither on performance nor robustness, but more on the working (and hopefully correct) way of handling A2DP connection under bluez. That being said, I find that the Sink is good enough, while the Source is a bit unsatisfactory. There is a README inside the tarball that shows how you can setup ALSA asoundrc for use with the A2DP Source so that it can act as a poor man's ALSA PCM plugin.
As usual, the code is released under GNU GPL Version 3 or later unless the bits that I took from PulseAudion and bluez itself (SBC stuff, SBC setup stuff, and actual A2DP packet encoding/decoding) - they are licensed as per the original PulseAudio and bluez licenses.
Get it from here.
Bluez 5 and beyond
Question: Bluez 4.x is already obsolete by now. What do I have to do to get this example to work with bluez 5?
Answer: A lot of work.
I have not investigated bluez 5 version of this fully as I'm quite satisfied with bluez 4 for now. But from what I have gathered, the sequence of events is identical. Sure the DBus interfaces change their names (bluez 5 add "1" to the interface names, e.g. "org.bluez.MediaEndpoint" becomes "org.bluez.MediaEndpoint1"); and the signals change their skins too (AudioSource/AudioSink are gone, replaced by generic org.freedesktop.Properties.PropertyChanged, and you can probably decide whether to start/stop streaming directly from the state instead of having to watch the transitions), but the underlying events are still the same.
Conclusion
A2DP is just a small part of Bluetooth specification. If you look at the links I gave earlier, you will see Bluetooth comes with over two dozen "profiles" (ie, functionalities). Bluez doesn't implement all of them (although the unimplemented list is getting smaller very day, thanks for the very hard work of bluez developers), which is fine, but bluez could really do better with its documentation. At least give us userspace programmers something to get around our head on. Until that happens, I still consider that "bluez is one of the best kept secrets in Linux".
Comments - Edit - Delete
Bluez must be one of the best kept secrets in Linux
PrologueYou don't believe me? Quick - tell me, what does Socket option mean in /etc/bluetooth/audio.conf? Why does it have to be enabled for audio streaming (from computer to bluetooth speakers/headsts) to work? Along the way, what are other options (other than this "Socket") available, and what do they mean?
Not in your local manpages? Here, let me google it for you: http://bit.ly/11q1jdq
The first link (at least in my browser here, everyone knows Google does habit-tracking...) will bring you to the ArchLinux wiki. Arch Wiki is usually very explanatory, but for this case, if you scroll down and read the details about this "socket" stuff - well, it simply refers back to its source, Gentoo Wiki. Let me save your from googling http://wiki.gentoo.org/wiki/Bluetooth_Headset. Yup, no explanation there either.
And from there, it goes down the rabbit hole. And down there I went.
Down the rabbit hole
The latest release of Fatdog64 comes with partial bluetooth support using bluez 4.101 (the latest and probably final release of bluez 4.x series, now that is has been superseded by bluez 5.x). Bluez 4.x series comes with an ALSA PCM plugin. This plugin makes it possible for the computer to stream audio to bluetooth speakers (and headsets) - provided, of course, one has the correct settings in audio.conf with that Enable=Socket line inside (yes, Fatdog64 is pre-configured with this). All that is required after that is to setup the correct asoundrc file, and in Fatdog64 this is taken care of by the Set Default Soundcard applet in Fatdog64's control panel. In short, with this you can listen to youtube using your bluetooth speakers.
In technical terms, the bluez ALSA PCM plugin is a Source - source of the audio stream, to be sent over to the bluetooth speakers. The speakers in this case is called as the Sink - where the audio stream is received.
But there is no plugin for the reverse.
That is, how to to listen to the music in your phone from your computer? (the computer may be connected to a stereo set). That is, how to make the computer as the Sink with the phone as the "Source"?
Back to google. And google I did, nothing I found. All the references I can find when I googled for "bluetooth streaming audio to my computer" always refer to how to do it with PulseAudio (load pulseaudio module this and module that, connect them, and magic happens). Very helpful and very handy except that it is useless for me because I don't run PulseAudio and I'm not about to. (I don't have to run PulseAudio or any other audio server when I plug-in a USB audio soundcard - so why should bluetooth?!)
Remember what I said at the beginning? "Bluez must be one of the best kept secrets in Linux."
Bluez source tarball comes with a /doc directory that contains a handful of text files containing extremely concise DBus "API" descriptions. Now, I am not allergic to documentation in text format (in fact I'm very annoyed with packages whose documentation need to be "made" or "built" first before it can be read - especially if it requires huge or esoteric tools to do so - but that's another story); but did I just say "handful" and "extremely concise"? You can have a taste of this "documentation" here. No howtos. No tutorials. Not on the source tarball, not on bluez.org, not anywhere. In fact, later on I learnt that some of these "API" are not APIs at all - some of them are "function prototypes" ("DBus interfaces") for callbacks which our own application has to provide and will be called by bluez! (instead of us calling into bluez). (Note: There is actually a rather nice bluetooth/bluez tutorial here, but it focuses on data communication aspect of bluez using sockets and RFCOMM; nothing to with bluez DBus API and audio/media. Again, there is no documentation from bluez for these subjects too!).
Sure, hotshot - someone might say - why don't I just read pcm_bluetooth.c (the ALSA PCM plugin) from bluez package, understand the interface, and reverse it to create the "Sink" interface? I will have to admit, I'm not that well versed with ALSA plugin interfaces which is absolutely required if you want to separate the ALSA stuff from bluez stuff in pcm_bluetooth.c (I know ALSA good enough to output sound using its API, but that's it). And my original idea is once I have the "Sink" interface, I will extract the audio stream in a known format and send it to stdout where I can pipe it over to "aplay" or "ffmpeg" or "sox" or whatever to actually output the soud; this way I don't have to mess with ALSA libs at all.
So I didn't follow that path, and later on it turned out to be a good move for a reason even more obscure: The ALSA PCM plugin talks to bluez using what is called as the "audio socket API" (this, by the way, is the answer to the first question on the opening paragraph of this post) and it is already deprecated for sometime (which is why it isn't enabled by default).
OK. Lacking this first-hand information from bluez, I spent hours googling to find explanations or at least overview of what this bluez DBus audio/media API is all about.
Among hundreds of results from Google, I could only find one place that explains it, here. It is simply the simplest, clearest overview of bluez usage from userspace perspective. It was written in the context of Android but it easily applies to other situations too. Buried deep in that post, is a link to a PDF document which highlights bluez DBus API overview, http://download.tizen.org/misc/media/conference2012/wednesday/bayview/2012-05-09-0900-0940-bluez-_plugging_the_unpluggable.pdf.
One wonders why this very important document is hidden deep inside Tizen's website maze. Only after one realises that bluez is mainly driven by Intel (and Nokia in the past, when they were still supporting the Maemo platform), you will see the connection: Tizen is a joint Intel-Nokia initiative too (being the rightful descendant of Maemo/Meego/Moblin). There is nothing wrong with that, in fact I'm glad that they take the initiative to sponsor the development of this very important protocol stack in Linux kernel. My only question is this: why oh why isn't this information available from bluez.org instead; is that too much to ask?
Anyway. That PDF got me started, but that information is - as mathematicians call it - necessary but not sufficient.
One need to read this post (I need to enable the Source interface in audio.conf), this post (when I can request bluez for the file descriptor for actual reading/writing of audio data) and then lastly this post (I need to disable the Socket interface otherwise the bluez Media DBus API won't work!) to make it work.
Once done this enabled me to dump the audio data to stdout.
Nice! But how to actually listen to that?
As it turns out, the audio data is compressed with SBC codec. But I can't just use "sbcdec" tool from SBC package to decode it, as the audio data is encapsulated in A2DP packets, not naked SBC-compressed audio data. A2DP packets are RTP packets (referenced by A2DP specification, and detailed in this IETF draft) containing A2DP Media Payload. We need to extract the SBC audio data, pass it through SBC decompressor, and only then we get raw audio data that can be sent to ALSA.
I took a shortcut - I already know of a good implementation that can do this decoding: PulseAudio. So I cracked open PulseAudio source tarball. Fortunately the encoding/ decoding functions are obvious enough even for one who knows zilch about PulseAudio internals; I took the decoding function out and merge it to my code.
Minor details such as how to tell my phone to connect its audio source to my computer was found rather quickly by trial and error, like this:
dbus-send --system --dest=org.bluez /org/bluez/[bluetoothd-pid]/hci0/dev_XX_XX_XX_XX_XX_XX org.bluez.AudioSource.Connect(it is one long line, not two lines).
And the first sound that came from my phone aptly came from a song called "Painting Raindows" :)
Notes: Bluez sinks and sources
Note to self: bluez' treatment of the terms "Source" and "Sink" are not consistent. Let me explain:
Bluez audio has two interfaces, like these:
"bluetooth device <--> (a) bluez (b) <--> application"
For example, in our case, viewed from (a), the interface is called as a "sink" because bluez receives data from external bluetooth device (the phone). Once processed, bluez will pass the data to an external application (view (b)); viewed from here bluez acts as a "source" of data to this external application.
The Bluetooth specification always uses viewpoint from (a). Bluez uses both view points, sometimes from (a) and sometimes from (b). That is also the very reason why to enable the computer to act as an audio "sink", we need to add "Source" to audio.conf.
Did I say that bluez must be one of the best kept secrets in Linux?
One more thing, honey ...
Once I got the audio sink working, I was about to wrap up and close my little experiment when I realised something.
Do you remember what I said about enabling Socket in audio.conf to enable ALSA PCM plugin, so that one can stream audio from the computer to the external bluetooth speaker? Good. Do you remember what I said about disabling Socket in audio.conf before the bluez Media DBus API can work, so that we can stream audio from phones to the computer? Good.
Not!
Obviously it means I can't do both at the same time!
Well, the solution, according to the bluez team, is simply to drop the Socket API (and the associated built-in ALSA PCM plugin) altogether because it is already deprecated and will be removed soon anyway! In another words, I will now also need to write the an A2DP "Source" interface. This time around, google didn't help me at all, but fortunately the bluez team did the correct thing and followed the same exact event flow with the "Sink" interface, as tests and trials confirmed. So I just need to modify the code a little to listen to different events (AudioSink instead of AudioSource). As before, the A2DP packet preparation and SBC compression is taken from PulseAudio.
To the future and beyond ...
And the happy ending is, all this work will be at least partially wasted in bluez 5. Firstly, bluez 5 removes the Audio Socket API (which also means the built-in ALSA PCM plugin is gone for good). Secondly, bluez has big API changes. Apps built for bluez 4 *will not work* without re-factoring and re-testing. Sure, using the DBus API instead of the socket API is a smart move, but still not good enough for bluez 5.
I am not the only one. It is telling that even PulseAudio team themselves have not released a version that supports bluez 5, six months after the first version of bluez 5 was released. Mind you, PulseAudio team works closely with bluez team; they got first hand knowledge of the impending changes and has already started to patch PulseAudio to accomodate bluez 5 API well before bluez 5 was officially released....
Apparently, despite being the official Linux bluetooth stack since 2001, bluez userspace API is not stable yet...
As for Fatdog64, I think I will stick with 4.101 for a while.
The code
I will follow this up with another post that documents all the findings in more details, as well as the corresponding source tarball.
The Sink works relatively well, the Source, while usable, isn't a comparable replacement for the ALSA PCM plugin. It sort of works; you can pipe raw sound data to it and you will hear it on your bluetooth speaker. Combined with ALSA PCM File plugin, it can be used as a poor man's ALSA PCM output plugin, but it doesn't always work (ffmpeg works, VLC stutters, youtube simply crashes). It also suffers from an odd problem of stuttering when I connect both the sink and source at the same time (the sink never stutters).
The code is meant as a proof-of-concept, as a learning tool, and as a working example of the bluez Audio/Media interfaces. It focuses on neither performance nor robustness. If I have time and inclination I may do one that do it properly - as a native ALSA PCM plugin.
Epilogue
I have not talked about DBus, bluez' IPC of choice. One can't avoid DBus at all because bluez API is exposed as DBus method calls (bluez has other kind of APIs - these are totally undocumented). Some jokingly said that one of the reason why DBus is so popular in embedded devices is because if people want to get bluetooth functionality using bluez, they'd better bring DBus in too ...
I'd talk about DBus, "whose reference library is not meant to be used", in another occasion.
As a parting note, here is the link to a suite of bluetooth userspace tools much better than the one you can find in bluez package itself. I wish this tool is more popular, I wish I had know this tool when I started to experiment with Fatdog64's bluetooth support. Isn't it telling that most of wikis and solution websites advocate the usage of "simple-agent" python script when one needs to do device pairing on command line - when this python script actually lives in "/test" directory inside bluez source tarball? Hmmmm.
Bluez must be one of the best kept secrets in Linux.
Comments - Edit - Delete
Linux Container in Fatdog
IntroductionAs noted in this and this post, I have been experimenting with Linux Containers (LXC or lxc for short) lately.
What is LXC? In short, it is a collection of technologies that allows processes to be compartmentalised. A process in one compartment (or "container", in LXC-speak) cannot interact with processes in other compartments. It's the equivalent (in terms of concept) of FreeBSD jail in Linux.
What is it good for? It's good to secure 'server' processes, as when these processes are broken, an attacker can only affect things inside the container (presumably, each server process is allocated one container to limit this kind of damage). This has been the basis for the so-called Operating System Virtualisation.
In this respect, LXC is late to the game. FreeBSD has its jail for years. Solaris as 'Solaris Container', and so is many other operating systems (except Windows, probably
 ). In Linux alone, it has been preceeded by Linux VServer and Virtuozzo/OpenVZ by years. They also have more features that LXC currently doesn't have. LXC however, has the benefit of being available from the vanilla kernel, not patches needed - just compile-time configuration.
More information about LXC: here (LXC manpage), here (IBM developerworks), here (Ubuntu community wiki) and many others you can find using your favorite search engine.
LXC support in Fatdog
In next version of Fatdog, the kernel will support LXC.
Many years in the making, the final component of LXC ("user namespaces") was merged with the kernel in Linux 3.8. Unfortunately, this component requires extensive changes to other kernel components that when many of them were not ready for this change; thus making 3.8 kernel less than ideal for running LXC. The situation is better in Linux 3.9 - only the XFS filesystem still doesn't work with user namespaces. I was hoping that 3.10 would fix this but as of today, at 3.10-rc4, I see don't see it happening, so if we ever need to ship Fatdog with one of these kernel, we will have to choose either to enable XFS filesystem support, or to enable user namespaces. I hope we don't have to choose by the time we release. LXC can still run without user namespaces feature, although it will be less secure.
In addition to the kernel, one needs to install LXC userspace utilities from the Package Manager (this model is similar to User Mode Linux support in Fatdog - the scripts are there, but you need to install the userspace utilities and the UML kernel first).
Now, when creating the Fatdog convenience interface to LXC, I have two choices:
a) follow the sandbox model (zero configuration)
b) follow the UML model (persistent configuration)
I have decided to follow the sandbox model (zero configuration). The scripts are called sandbox-lxc (and rw-sandbox-lxc for the one with persistent storage). The reasons I go with this model is:
a) it is slightly easier to use
b) if one needs to run an LXC container with persistent configuration, the LXC userspace tools themselves already supports this model (see lxc-create and format of lxc-template config-file, so there is no need to duplicate this excellent functionality.
c) lastly, with the sandbox model you can easily copy/transfer/backup the container root filesystem from the "host" (e.g. a tool like sb2dir.sh will work; if you need to copy files to the sandbox just copy it over to the sandbox's fakeroot).
How to use these scripts? They are identical with sandbox scripts, so instead of sandbox.sh you run sandbox-lxc.sh. Instead of rw-sandbox.sh you run rw-sandbox-lxc.sh.
When run, in addition to asking about the layers you want to use, it will also ask whether you want to be able to launch a desktop. If you said yes, the host's /tmp will be mapped inside the container - which means the processes inside the sandbox can change stuff in the host system and connect to processes in the host - but it is a requirement if you want to run Xnest from inside the container.
These scripts by default will run without user namespaces. You can tell them to run with user namespaces by putting IDMAP=yes to the environment before running them, like this: IDMAP=yes sandbox-lxc.sh. Support for kernel user namespaces is auto-detected, if the kernel doesn't support it IDMAP will have no effect.
When run without user namespaces, these capabilities are dropped: sys_module (load kernel module), sys_time (change system time), and syslog (change kernel logging parameters).
When run with user namespaces, all the UID are shifted by 10000 (ie, the container's root is actually a user with UID 10000 in the system).
In either case, the container cannot create block device nodes (only character devices) and will have its own hostname and network interface which you need to configure manually if you want to connect to the network from within the container.
These scripts, the LXC-enabled kernel will be in the next release of Fatdog (the LXC-userspace tools are already in Package Manager but they are useless without LXC-enabled kernel). Beware that they are still considered experimental, as is LXC itself.
Comments - Edit - Delete
AMD Catalyst driver patch for CONFIG_USER_NS
As hinted in this post, I have been experimenting with LXC for while. It has been a fruitful journey and I ended up with an LXC-version of Fatdog sandbox which enables one to run a sandbox with full privilege separation (unlike the standard sandbox which only uses chroot), which I will write in another day.Running lxc requires the lxc userspace tools (which is on the sourceforge.net URL above, or here for the bleeding edge), and requires some kernel compile-only options activated. No, unlike OpenVZ or Linux-VServer, you don't need custom kernels --- all that is needed for lxc have been slowly merged into mainline kernel in the last few years, but you do need to enable these features when you built the kernel.
One of the latest feature is user namespace (CONFIG_USER_NS). This feature, in short, enables uid mapping - a "root" (uid 0) in the container can be just a regular user in the host system (e.g. uid 1000). Without this feature, a root is a root is a root - inside and outside the container and it has the same power (unless you shave its capabilities - but again that's another story). This feature was finally merged in Linux 3.8, however it wasn't really working well because a lot of other kernel components were not adjusted for it (mainly filesystems). In Linux 3.9, the situation is a bit better, only XFS can't handle it. With the hard work from the kernel and XFS team, we'd expect that XFS will be fully compatible with user namespace by the time Linux 3.10 is released.
I have been testing with this feature in Linux 3.9, and found out that the AMD Catalyst driver would not compile. That's a BIG problem. My laptop is well supported by the radeon open-source driver, but I regret to say that while radeon probably trumps out in terms of performance, it is not a winner when it comes to power saving department. My laptop runs a full 20 centigrade hotter using the radeon driver compared to the Catalyst driver. AMD definitely needs to do more work on this! (Are you listening, AMD?)
Anyway, the conclusion is that I need that Catalyst driver to work. Just like any reasonable guy, I looked for some patches on Google but I can't find any :(
So I went on to look at the source on my own. Fortunately, it is not too difficult to fix it, and I have created a patch for it (it is a one-line patch, literally). I tested this against Catalyst 12.8 but it should work for later versions too (up to 13.4).
You can get the patch from here.
Enjoy.
Comments - Edit - Delete
Booting GPT disk in BIOS systems using syslinux
Recently I was asked whether it is possible to boot GPT disk under a system with BIOS firmware.I was somehow under the impression that GPT-partitioned disk (GPT disk for short), though perfectly usable in Linux, will not boot under BIOS systems. You need EFI or UEFI systems to boot GPT disk - that was the conventional wisdom that I subscribed to; and that was the piece of wisdom I was about to dump to the inquirer.
The good thing is that I am aware that the wisdom I subscribed to is rather old; that there may be some advancement in the fields; and especially that a GPT partition usually has a MBR protective partition which in theory could contain bootable code just like a standard MBR does; so I decided to do some quick research and tests first to avoid embarassing myself by giving the wrong answer.
It was a good decision as it turns out that GPT disk is indeed bootable under BIOS too! The answer actually depends on the BIOS and the bootloader.
As long as the BIOS in your system is happy to load MBR code and execute it - you're already halfway to the happy end. Some BIOS-es only check that the MBR is valid and will happily execute it if it does (these are the good ones), some are more tricky and check whether the MBR has a valid bootable partition (this is still workable though it needs more work), but some are recalcitrant and need a specific crafted MBR to boot from it - if you happen to have one of these, your luck may have run out.
The second part is the bootloader. GRUB2 definitely supports booting from GPT disk, and so is syslinux. Legacy Grub (Grub 0.97) does not, however there seems to be a patched version which does. Grub4Dos definitely does not support it, at least at the time of writing.
Okay, so how do one configure it? Every bootloader is different, of course, but I'll set the example with syslinux, as it is pretty easy.
For the following I will assume that your GPT disk is /dev/sda and your (soon-to-be) bootable partition is partition 3, that is, /dev/sda3. Obviously change all references to /dev/sda, /dev/sda3 and the partition 3 to your own setup.
1. Use GPT partitioning tool to mark that the partition is going to be bootable.
If you use gparted, choose "Manage Flags" and tick "legacy boot".
If you use sgdisk, type
sgdisk -A 3:set:2 /dev/sdaIf you use the interactive gdisk (by typing "gdisk /dev/sda"), enter the "extra functionality (experts only)" by typing "x", and then choose "set attributes" by typing "a". You will be asked for which partition to update, choose "3", and from there you will be asked which bit to enable, so choose "legacy BIOS bootable" by typing "2". Don't forget to save your changes by typing "w".
2. Next, mount the partition somewhere, say in /mnt/data
mount /dev/sda3 /mnt/dataLet's assume that the partition (for the sake of the discussion) is a Linux filesystem such as ext3 or ext4.
3. Use syslinux to install the boot loader, pretending that it is a regular partition:
extlinux -i /mnt/dataextlinux -i /mnt/data/boot4. The final magic is to copy syslinux's MBR code which is capable of booting GPT partition. This code is stored (usually) in /usr/share/syslinux/gptmbr.bin. All you need to do is copy this to your disk's MBR.
dd if=/usr/share/syslinux/gptmbr.bin of=/dev/sda bs=440 count=15. Congratulations, you're done! Do the usual cleanup (un-mount /mnt/data, etc) and then reboot.
6. Assuming however, you have done all these correctly and BIOS still won't boot the system (saying no bootable disk found etc), you may need to mark the protective MBR as bootable. You need to do this using "fdisk". Start "fdisk" on the disk (fdisk /dev/sda) and ignore the warnings. Type "a" to toggle the bootable flag, and choose "1" for the partition to enable. ("1", not "3", because now we are talking about the protective MBR, and there is only one partition in the MBR - the protective partition). Don't forget to save your work by typing "w". Note that doing this is actually discouraged, see for example: http://mjg59.dreamwidth.org/8035.html (Matt Garret is the expert on all things UEFI, he is the author of the 'shim' bootloader used by many Linux distros which provides compatibility with UEFI and Secure Boot) - but if this is what it takes for your system to boot, then so be it.
Caution 1: Installing bootloader is not for the faint of heart, and you'd better have a backup plan if this is your *primary* computer, in case you're doing it wrong and the system cannot come to life after that. Installing a bootloader also means that ALL your previously installed operating system will not boot unless you configure the new bootloader to boot them. If you don't understand the consequences of the actions described in the above steps, you'd better stay away from doing this altogether. You have been warned.
Caution 2:The method described above assumes that you use a GPT with a standard protective MBR partition. In this scheme, you only have one partition defined on the MBR - partition of type 'ee' which covers the entire disk; and this is the recommended way to do it. gdisk actually offers another type of protective MBR called "hybrid MBR", in this case, the GPT partition definitions are copied and mirrored into the MBR partition definitions - if you have 3 partitions in GPT you will have 4 partitions in MBR (3 GPT + original protective). This method is highly discouraged, and the reason why is written here: http://www.rodsbooks.com/gdisk/hybrid.html (by the author of gptfdisk itself).
Comments - Edit - Delete
Fatdog64 sandbox as application container
Fatdog64 has a built-in sandbox for experimenting. It is an old feature, existing since as early as Fatdog64 520. It has been a useful feature, I use it almost always when it comes to building and packaging applications. But it has one main weakness - there can only be one sandbox running at one time. In other words, you cannot run multiple sandboxes at the same time.That restriction was largely for stability reasons (long time ago, the sandbox didn't have proper termination code - you could accidentally close the sandbox shell and the sandbox will continue to run, with no way to properly shut it down). That has been addressed for a while now so it is no longer an issue.
But what purpose would it serve to be able to run multiple sandboxes? After all, sandbox was originally invented to "test foreign applications" by installing them in a throwaway memory filesystem (tmpfs). What good use could ever come out of running it multiple times?
The key answer is rw-sandbox. Sandbox actually consist of two applications - sandbox proper and a counter-part called rw-sandbox. rw-sandbox is an under-utilised, under-appreciated application that works and behaves just like the regular sandbox except that it stores all the changes (="state" if you will) into a persistent image file instead of in a throwaway memory layer. Thus it is possible to start an rw-sandbox session, do something and then leave, to return and re-start the session later and find all the changes are still there. The difference between sandbox and rw-sandbox is just like running Fatdog without a savefile (sandbox) and with a savefile (rw-sandbox) - in fact rw-sandbox's image has identical format as Fatdog's savefile.
As it turned out, rw-sandbox is ideal for isolate applications. One can install and run an application into a rw-sandbox, and keep its state - the binaries, the configuration files, etc, from one invocation to another - just like as if the application is installed on the main system itself. In fact, with rw-sandbox, I could install the same application in multiple rw-sandboxes, each with a different configuration. Pop! Instant "multiple-profile" for applications even for those who don't support it natively. I could also install different version of the application, without conflicting with each other.
This also happens to be another way to deliver packages - instead of the regular PET package or SFS package, one can deliver a compressed rw-sandbox image. It has the benefits of containing both the application binaries *and* configuration in one place - the rw-sandbox. (Using PET, both the binaries and configs are stored in savefile. Using SFS, the binaries is in the SFS but the configs is in the savefile).
In other words, one can use rw-sandbox as an "application container". And what makes it more useful is that since the application (and all of its configuration) resides outside the savefile, outside the OS), one can upgrade the system (within limits of compatibility), the OS, etc even wiping out and re-creating savefile from scratch if need to, and the application and its data is still faithfully there for you to use.
And how about backing up? As easy as backing up a savefile: copy the rw-sandbox image, and you're good to go.
Of course, it is only useful if we can run multiple sandboxes at the same time - otherwise it is too restrictive if when I run LibreOffice from the sandbox, I can't run Sweet Home 3D stored in different sandbox.
That would be motivation enough to modify sandbox, and so I did. Multiple sandbox can now be run at the same time; and this change will be in the next release of Fatdog.
Note: The sandbox is currently implemented as chroot jail. As such, it currently only isolates the filesystem, but nothing else. Applications within sandboxes shares networks, process ids etc with the rest of the system and thus malicious applications can easily kill each other, even on those on the "host" or on another sandbox. Thus this method is only suitable for "well-behaved" applications. Obviously this method would also not be suitable for "network" or "server" applications (those that listens on sockets), unless you can configure which socket to listen/connect to so they don't try to stomp on each other's network sockets.
If you want complete isolation then consider using other methods, such as User Mode Linux (UML) discussed here (also included in Fatdog64, see this FAQ entry) or even KVM/Qemu (available from the Package Manager). In the future, I may add Linux Containers too.
Comments - Edit - Delete
Detecting keyboard state in shell
A discussion happened recently and a need was raised to detect key states (whether a certain key is pressed) in shell, see here http://bkhome.org/blog2/?viewDetailed=00238 (second comment). So I went googling for a while, found the answer here: http://stackoverflow.com/questions/3649874/how-to-get-keyboard-state-in-linux and tidy it up a little bit, as attached.Usage: kbstate key [devpath]
Returns: 0 if key is pressed, 1 otherwise, 255 for errors.
key is either lshift, rshift, lalt, ralt, lctrl, or rctrl (that's left/right shifts, left/right alts, left/right controls) in English keyboard, not sure the equivalents in others. If you hack the source you can easily check for other keys too.
devpath is the path to the Linux's keyboard event device. The default value is /dev/input/by-path/platform-i8042-serio-0-event-kbd (that is, the built-in PS/2 keyboard) but most of the time you would specify /dev/input/event5 or something. Scan /proc/bus/input/devices, find a device whose handlers is "kbd", and you know which /dev/input/eventXXX you need to specify.
If you need to test multiple keyboards (PS/2, USB, etc) you will need to call kbstate multiple times, one for each devpath.
Get the source, 32-bit static binary and 64-bit static binary.
Comments - Edit - Delete
guess_fstype from busybox
guess_fstype is a small utility to - well, "guess" the "filesystem" that resides in a given block device. It is used extensively in Puppy Linux and its variants including Fatdog. Its job is so important that if you have a malfunctioning binary then most of desktop filesystem operations will cease to work correctly.guess_fstype was originally cobbled from guess_fstype_* functions from mount.c in util-linux (long before util-linux had blkid), it came from the same set of functions which powers "mount --guess-fstype" (which also gives the binary its name).
Over time, more and more filesystem type detections got added, and the code becomes more and more messier. It still works, and it still works beautifully, but it is not easy to maintain. So I began to search for a replacement.
klibc
klibc has an explicit standalone "fstype" binary, which is used to do exactly what guess_fstype does (but its output is different). It is small and fast and static - it's a good candidate. Unfortunately, its repertoire of filesystem detection is less than sterling - it lacks popular filesystems such as FAT and NTFS. While it can be patched to add those two, the point of my exercise is to try to *not* to maintain the detection code myself.
busybox
I turned on to busybox, which also has filesystem detection code. As it turns out, it is relatively easy to use them for a standalone application, and to my delight they are rather complete too. So I created a patch that will create a guess_fstype-equivalent from busybox.
To use the patch:
1. Extract vanilla busybox 1.21 source
2. Apply the patch (get it from here)
3. Go to the volume-id directory
4. Type "make"
5. You will end-up with a bb_guess_fstype which can be renamed to guess_fstype for proper use.
Busybox's guess_fstype recognises less than the original Puppy's busybox, but I don't think this is a problem as what it lacks are "exotic" filesystems anyway (everyone ever user xiafs recently?
) and would be very rarely used, if ever, indeed.
You can fine-tune the filesystem to detect by editing the fake_libbb.h (removing the defines) as well as the Makefile (removing the object code from being linked in).
When new version of busybox is released, all that I need to do is to update this patch. There will be no need to separately maintain the filesystem detection code anymore. As for now, I actually included the f2fs filesystem detection code in the patch, but as soon as this is supported by busybox natively, it will be dropped.
This new guess_fstype will be in the next version of Fatdog.
Comments - Edit - Delete

